How to Draw Realistic Dog Eyes: A Step-by-Step Guide
Here’s a breakdown of how to draw realistic dog eyes, along with key tips for success:
Materials
- Sketching paper
- Pencils (varying hardnesses like HB, 2B, 4B)
- Eraser
- Reference photo (optional)
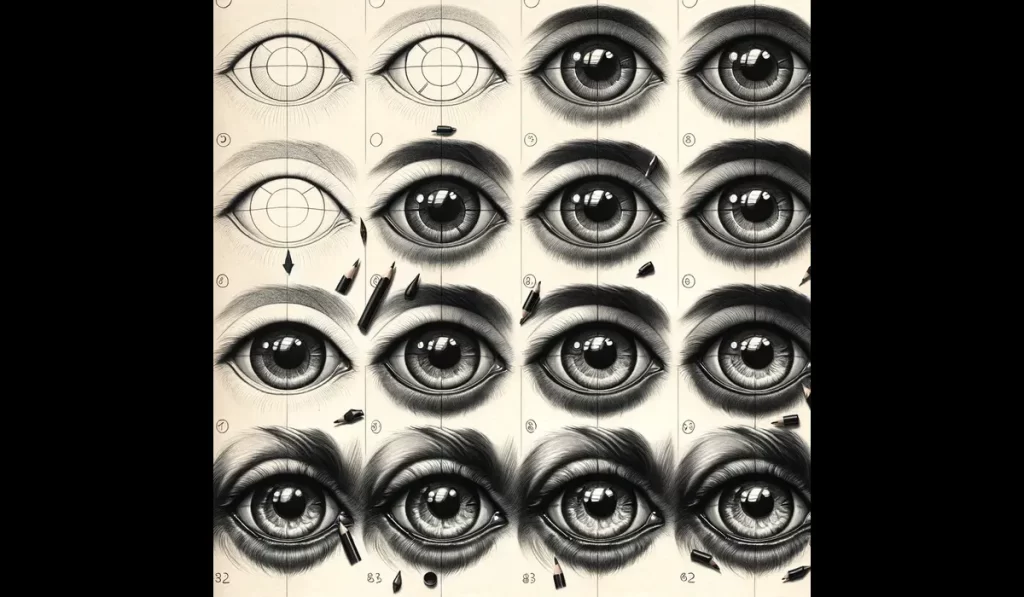
Steps
-
Basic Shapes:
- Start with light pencil strokes. Draw two slightly tapered ovals for the overall eye shape. Position them appropriately on your dog’s face based on your reference or imagination.
-
Iris and Pupil:
- Within each oval, draw a circle for the iris. Leave a small gap between the iris and the outer eye shape.
- Inside the iris, draw a smaller, darker circle for the pupil.
-
Highlights:
- Within the pupil, add a tiny white circle or dot to represent the reflection of light.
- You may also add smaller highlights within the iris for a more detailed look.
-
Eyelids:
- Draw a subtle curved line under each eye for the lower lid.
- Lightly sketch the upper lid, ensuring it partially covers the top of the iris for a natural look.
-
Details:
- Add eyelashes with delicate, curved strokes along the upper and lower lids.
- Use shading and subtle lines within the iris to create texture and depth.
- Define the corners of the eye (tear ducts) with slight shading.
-
Shading and Texture:
- Use soft pencils (like 2B or 4B) to shade around the eyes, creating depth and dimension.
- Pay attention to shadows and the way light falls on the eye’s surface.
Tips
- Observation: Study photos or observe real dogs to understand how eye shape, highlights, and shadows vary with dog breed and expression.
- Light Pressure: Begin with light pencil strokes for easy adjustments. Gradually darken as you refine the shapes and details.
- Blending: Use your finger or a blending tool to smooth out harsh lines and create subtle transitions in shading.
- Patience: Drawing realistic eyes takes practice. Be patient and don’t be afraid to experiment.
Key Takeaways:
- Focus on the basic shapes and placement before adding details.
- Use light and shadow to create the illusion of depth and dimension.
- Pay attention to tiny details like highlights and subtle texture within the iris.
Remember: With practice and attention to detail, you can create beautiful, expressive dog eyes in your artwork!
Drawing Dogs Eyes
To draw a dog’s eyes, follow these steps:
- Begin by drawing two ovals on your paper to represent the dog’s eyes. The ovals should be slightly larger at the bottom and narrower at the top, and they should be positioned on the dog’s face in line with the nose.
- Draw a circle inside each of the ovals, representing the iris and pupil of the dog’s eyes. The circles should be positioned slightly off-center within the ovals, and they should be slightly smaller than the ovals.
- Draw a small circle or dot in the center of each iris, representing the light-reflecting area of the dog’s eyes. The circles or dots should be positioned in the center of the irises, and they should be slightly smaller than the irises.
- Draw a curved line under each eye to represent the lower eyelid. The lines should be positioned slightly below the irises, and they should be curved to match the shape of the irises.
- Add details to the eyes, such as eyelashes, highlights, and shadows. Use thin, curved lines to draw the eyelashes on the upper and lower eyelids, and use small dots or lines to add highlights and shadows to the irises and pupils.
Trick to Draw Dog Eyes?
One trick to help you draw a realistic dog’s eyes is to pay attention to the shape, size, and position of the eyes on the dog’s face.
Dogs’ eyes are typically almond-shaped, with the upper and lower eyelids curving slightly to match the shape of the iris.
The eyes should be positioned on the dog’s face in line with the nose, with the irises slightly off-center within the eyes.
Additionally, the size of the eyes should be proportionate to the rest of the dog’s face, with larger breeds typically having larger eyes than smaller breeds.
By paying attention to these details, you can create a realistic drawing of a dog’s eyes.
What are the Materials to Use While Making the Sketch?
To draw a dog’s eyes, you will need a few basic materials, such as paper, pencils, and erasers. You may also want to use additional materials, such as colored pencils, markers, or pens, to add color and detail to your drawing.
Additionally, you may want to use reference images or photos of dogs to help you get the proportions and details of the eyes right.
By using these materials, you can create a realistic drawing of a dog’s eyes that captures the shape, size, and position of the eyes on the dog’s face, as well as the details of the irises and pupils.
How to Draw Dog Eyes?
The choice of material will only differ for a painting, but the technique to perfectly draw a dog’s eyes will remain the same.
No matter what type of painting you have decided to make, following our guide to properly drawing a dog’s eye can be a master in adding an eye to your painting of animals.
The steps that you can follow to properly draw a dog’s eye are as follows.
Take All the Necessary Materials
You first have to take all the necessary things like the piece of cardboard, pencil, eraser and the paper near you. This will prevent you from being distracted while learning the tricks.
Place the Paper Over the Cardboard
The most important step to follow in learning the process is the proper placement of the paper over the cardboard.
You can also use pins to secure the paper with the cardboard to prevent it from moving, as the movement of paper between the drawing can disturb you during the process.
Draw the Basic Structure
Now it’s time to start the drawing. The first step you must follow to draw the eye is to draw an oval shape in the middle of the paper by leaving an appropriate place for perfect eyebrows.
Add a Small Hemisphere at the Left End
After drawing the oval, you have to draw a small hemisphere as per the size of your eye. If the height between the upper and lower lining is 3.5 inches, then the hemisphere should be slightly more than half an inch like ⅙.
Draw a Joining Line Within the Oval and the Hemisphere
Now it’s time to give a perfect shape to the eye corner. You can do this by drawing a curved line from slightly above the oval at the point of joining of the hemisphere to the endpoint of the hemisphere and then rub the lines that represent the joining of the hemisphere to the oval. Remember you have to erase the lines you have drawn previously as per the fourth step.
Add a Slightly Curved Triangle at the Right End of the Oval
The next step is to add a slightly curved triangle at the end of the oval to give the eye a more realistic look.
The ratio of the oval and the triangle should be the same as that of the hemisphere, and then you can adjust it accordingly by erasing and redrawing the line according to the look it gives to the eye.
Draw the Pupil
It’s one of the simplest steps during the entire process. All you have to do is just draw a small-sized oval within the first oval you have drawn and then again draw one-third of a circle within the second oval to make it realistic.
Draw the Lashes
The next step you have to follow is to draw the proper lashes over the eye. To draw proper lashes, all you have to do is draw some curved lines over the face oval and ensure that the curved lines do not cross the length of ½ inches. Draw at least 8 to 10 lines at the upper end and 7 to 8 at the lower end.
Make Lines of the Eyebrow
After following all the above steps, you are done with the structure of the eye. Now you have to draw the eyebrows, measure the distance between the two eyes you have drawn and start the lining a bit closer than the lining of the eyes.
At first, draw a rectangle of height, half of 1 cm, by maintaining a 35-degree angle from the eye and then give it a sharp end by joining lines from both the upper and lower end of the rectangle.
Draw the Hairs Within the Eyebrow
The eyebrows can’t remain empty. Drawing hair is very necessary to give it a complete look. To draw the hair, all you have to do is take a light-dark shaded pencil and start making layers of lines from the lower end to the upper end.
Darken the Area Where Needed
If you have followed all the steps mentioned above, you are done with your eye structure. The last and final remaining step you have to do is to darken the place wherever it is needed, like the pupils and the eyebrow.
All the steps mentioned above are based on the tricks followed by artists to give their drawings a more realistic look. So if you are looking for steps to properly draw a dog’s eyes, then you can completely rely upon the steps mentioned above to get the best results.
One important thing to keep in mind while addressing how to draw dog eyes is to highlight the delicate areas.
You can use white marker or color pencil to enhance the eyelashes, pupil, tear ducts, or wherever you feel like highlighting. That’s how you can make delicate and aesthetic sketches and paintings for your dogs.