How to Draw a Dog Bone?- Drawing a dog bone is not a difficult process, but if you are a beginner and completely new to the field of drawing, you might face some difficulties in drawing a dog bone properly. This is why the question of how to draw a dog bone has become popular nowadays.
How to Draw a Dog Bone: A Simple Guide
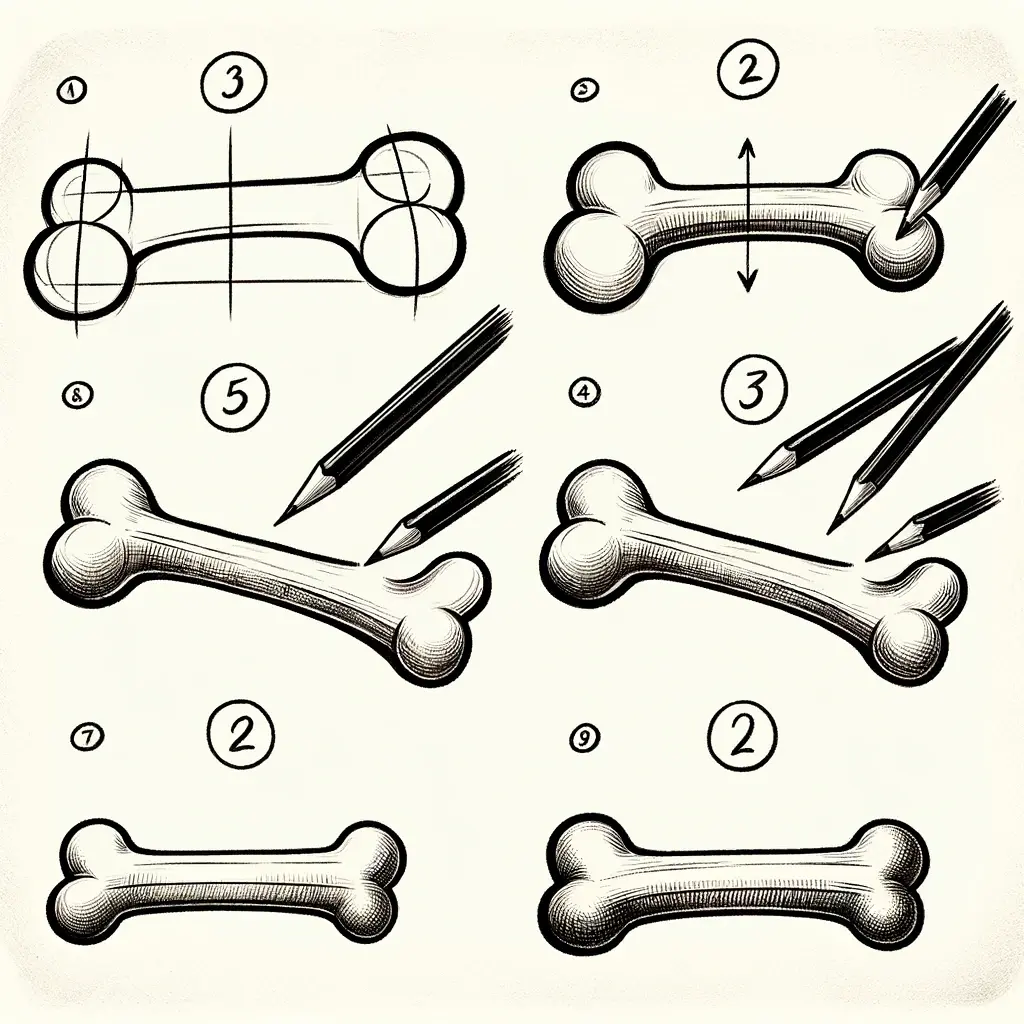
Drawing a dog bone is a fun and easy way to start honing your drawing skills! Here’s a breakdown of the process:
Materials
- Pencil
- Eraser
- Paper
- Optional: Coloring materials (crayons, colored pencils, etc.)
Instructions
-
Basic Shapes:
- Start by drawing two circles, side-by-side, to represent the ends of the bone.
- Draw two straight, parallel lines connecting the top and bottom of the circles. This forms the basic shape of the bone’s shaft.
-
Round the Edges:
- Slightly curve the lines where they meet the circles to soften the shape of the bone.
-
Outline and Detail:
- Go over the lines with a darker pencil to define the outline of the bone.
- Erase any unnecessary guide lines.
- Add texture by drawing small, irregular lines within the bone.
-
Shading (Optional):
- Use light and dark pencil strokes to create shadows, giving the bone a 3D look.
-
Coloring (Optional):
- Color the bone a light brown or tan color.
- Use darker shades for the shadows.
Tips
- Start Lightly: Draw with a light touch so you can easily make adjustments.
- Practice: The more you draw, the better you’ll become!
- Reference Images: Look at pictures of dog bones for inspiration and guidance on realistic details.
Key Takeaways
- Drawing a dog bone is all about starting with basic shapes and adding details.
- Don’t be afraid to experiment and have fun with the process.
Remember: Drawing is a skill, and with practice, you’ll be drawing dog bones (and other things!) like a pro.
What are the Proper Materials to Use for Making the Drawing?
Drawing a dog bone is quite an easy process, so you will not require any special materials like different colors, shaded pencils, etc. The materials that you should use for making the drawing properly are:
A Sharp-Pointed Pencil
A sharp-pointed pencil is required to draw perfect lines and give perfect shape to the bone.
An Eraser
An eraser will be required to erase the mistakes you make while making the linings of the bone.
A Piece of Board
A piece of board is necessary for all types of drawing you will make to pin up the paper.
Some Dark Shaded Pencils
You might require some dark-shaded pencils like 2H and 4H for darkening the area where needed.
A Scale
A scale will be required to draw the base of the bone as the technique will start by making you learn the basics first.
A Few Colors
If you want to make your bone look more real than a cartoon, then you can also go for filling it up with colors. You can go for soft pastels, crayons, watercolor, and many others as per your choice.
The above six are the things that you will require while starting the drawing of a dog’s bone. So if you are looking for the required materials to make the drawing of a dog bone, then you can go with those mentioned above.
Do’s and Don’ts to Follow
Before getting started with the drawing process, you should know the do’s and don’ts you have to follow during the process, as this will make you put less effort while making the drawing and can also give you better results.
Do’s
- Pin up the paper with a piece of board.
- Always use a sharp-pointed pencil while making the drawing.
- Use a Stonehenge paper to get the best results.
- Use scale for borders and the base of the sketch.
- Make the drawing with light hands.
Don’ts
- Never put pressure on the pencil while holding it.
- Never try to darken the lines while making the sketch. It should always be done after the completion of the drawing.
- Never use dark colors in the figure. Use it for the outline.
How to Draw a Dog Bone?
As we have discussed, you must follow all the required materials and the do’s and don’ts while making the drawing. It’s time, to begin with the process of making the sketch. The steps that you can follow for making the drawing of the dog bone are discussed below:
Placement of the Paper
The proper placement of the paper you are going to use for the drawing is very necessary. Make sure you use some pins to secure it with the piece of cardboard you choose. This will lead to a smooth process as the paper you choose will not move during the process after getting pinned.
Draw a Slightly Curved Line
The first step you have to follow for making the drawing of the bone is to make a diagonal, slightly curved line. This will be the base of one side of the bone.
Repeat it Below the Previous One
For making a complete base of the bone, you have to repeat another diagonal curved line below the previously drawn. Make sure both the diagonally curved lines are parallel to each other and are of the same length, as this will provide a perfect shaft of the bone.
Draw a C Shape on One Side of the Shaft
Now it’s time to draw the end portion of the bone. You can just draw a C-shaped structure from the first diagonal curved line and extend it by slightly curving it to the middle.
Repeat the Same Below the Previous C Structure
To complete one end of the shaft of the bone, you have to repeat the same C shape structure below from the end of the parallel line and join it to the previous one by slightly curving and extending it. Make sure the point where both C shapes join looks like the curve that forms on the upper side when we use it to draw a heart.
Make the End a Sharp Pointed
Now to give the end portion a perfect look, all you can do is just rub the end where the C-shaped join the lines and make it a bit pointed by slightly extending and joining it a few centimeters away from where you have previously joined it.
Repeat the Same Process on the Other Side
Now the endpoint of the bone will look the same on both sides, So you can simply draw it by following the 4th, 5th, and 6th step on the other side. You can also rotate the paper for drawing the other end of the shaft of the bone, as this will make the process easier.
Draw a Line Near the Lower Side of the Shaft
If you have followed all the steps mentioned above, the process of drawing a bone is almost complete. Now we are going to add some more details to it to make it look better. All you can do is just draw a line near the lower side of the shaft to give it a more realistic look.
C Shape at the Lower Line of the Bone End
Draw a light c shape near the lower C shape of the shaft you have drawn. Make sure it should be shorter in length than the main C shape structure.
Repeat the Same at the Diagonally Opposite C Shape
Now you can repeat the same shorter C shape below the original one but make sure it should be inversely proportional to the previous one you have drawn.
Add Two Dots at the Upper Ending of the Shaft
To make the bone look more perfect, make sure you add two to three dots at the upper side of the C shape structure. This is just needed to give the structure a perfect look.
Fill Up the Colors
Now, as you complete all the steps you must follow to make a perfect drawing, it’s time to fill up the colors. You can add a light brown color to the body of the bone and can use dark brown color for the lining. Make sure to darken the extra details you have added to the figure.
All the above discussed are the steps preferred by painters to draw a dog bone perfectly. So if you are looking for the steps to draw a dog bone perfectly, then you can rely on the above-discussed steps to make a perfect drawing.
Things You Need to Take Care of While Making the Drawing
Now we have discussed everything you must follow while making the drawing. It’s time to discuss some additional steps you have to follow to concentrate more while making the drawing.
Choose a Calm Ambiance
Some people might get anxious after trying hard to make the proper drawing. The individual’s anxiousness can be easily handled if the ambiance is silent and calm. If you choose a calm ambiance while learning the steps to draw, then it will be helpful to you in concentrating more on the process.
Keep Some Different Shade Pencils
Although mentioned above, you don’t need to use different shade pencils. Still, as a beginner, you can keep this aside by making the linings with different shades. This will be helpful to you in filling up the colors in the figure.
Keep a Tissue Paper
Keeping tissue paper by your side while making the drawing can be helpful. Even though you are using crayons, soft pastels, and pastels, it will help you spread the color to give the bone a perfect look.
Never Use a Brush to Spread Colors
It has been noticed that most people use a brush when it comes to spreading the colors. But it should be strictly avoided as using a brush can lead to a rough spreading of the colors. A brush should only be used while using watercolors.
You will face some difficulties if you are drawing a dog bone for the first time. To make the process effortless and perfect, you need patience, but it will happen when you know how to draw a dog bone.