Summary
To make a balloon dog, you’ll need a long balloon and a pump. Inflate the balloon, leaving a tail. Create the snout and ears with three basic twists, locking the ear segments together. Twist a neck, then two equal-length twists for the front legs, locking them with the neck. Divide the remaining balloon into the body, two back legs, and a tail, locking the back legs to the body. Beginners should avoid overinflating, use a pump, and practice basic twists like the basic twist, lock twist, and fold twist. Jeff Koons’ iconic Balloon Dog sculptures explore themes of childhood and celebration.
How To Make A Dog From A Balloon?
To make a dog balloon, you will need a long, narrow balloon, such as a 260 or 160 balloon, and a hand pump. Start by inflating the balloon with the hand pump until it is about half full. Then, tie a knot at the balloon’s end to secure the air inside.
Next, twist the balloon to form the shape of the dog’s body, with a long, curved tail and a rounded head. Using small balloon pieces or markers, you can also add ears, eyes, and a nose to the balloon.
Finally, inflate the balloon with more air until it is the desired size and shape, and tie another knot to secure the air inside. Repeat these steps to make additional dog balloons, and have fun playing with them or using them as decorations.
Basic Twist
This is the foundation twist required to start the balloon twisting session for balloon animals. You are to hold one end of the balloon with the less preferred hand and grab and twist the area you wish to twist with the dominant hand.
It would help to hold the balloon tightly so the twist does not unwind. It is used with a lock twist to create different balloon shapes.
Lock Twist
While making the body parts of your balloon dog, a lock twist is essential for making the body parts like legs, eyes, and hands as it holds the twists in place. A lock twist is made by creating two basic twists along with the balloon and making four balloon segments.
Then, if you twist the balloon in the same direction, you can twist as many bubbles without your creation coming apart. This twist is used to tell the shape of the balloon together.
Fold Twist
The fold twist, the loop twist, is used to make ears and noses on animals. It is similar to the lock twist; however, the two twists are far apart. It is similar to a lock twist but creates a loop. Once you fold the middle segment in half and adjust the two twists, you must further turn them together to form a loop.
Method to Tie the Balloon
You are to hold the balloon between your thumb and two fingers. Next, stretch and wrap the end of the balloon around your two fingers to tie the knot.
Steps to Make a Balloon Dog
Before making the balloon, you need to know the fundamental twists. Balloon twisting can be fun, but you require lots of patience. You must know the art of twisting, turning, and locking to create balloon animals.
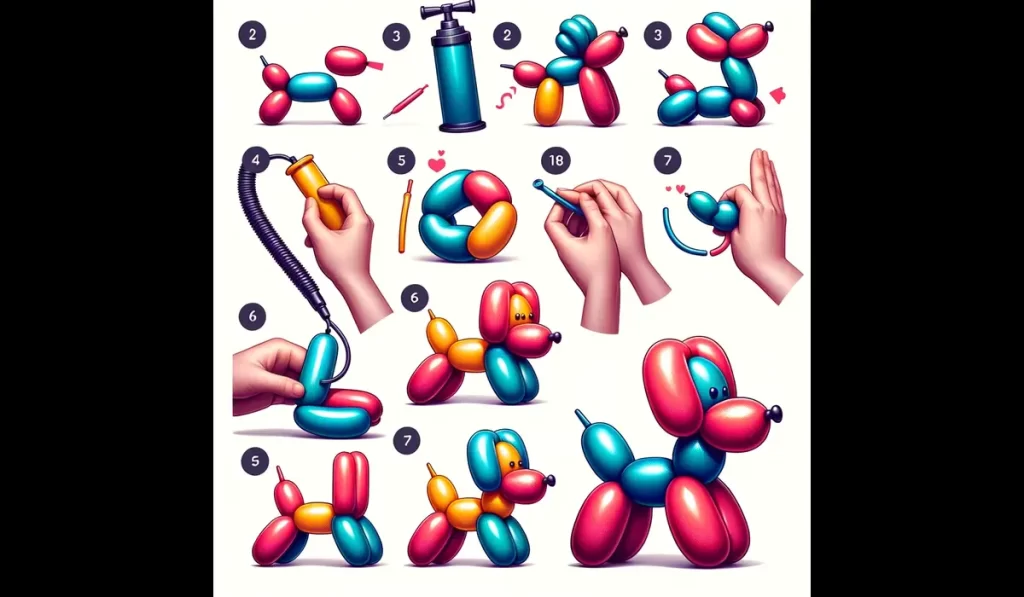
Step 1
Inflate the Balloon. Fill the balloon with air until a three-inch vacuum is at the end to tie a knot. Tie off the open end, leaving a 3-inch tail.
Step 2
Start making the three twists. Now, at the knotted end of the balloon, you have to make three basic twists to create four balloon segments.
The first segment that includes the balloon’s knot should be about 2 inches long and will form the dog’s snout. The first segment is longer than the second two segments and will form the dog’s ears.
The second and third twists at about 1 inch per twist. The last one, the longest, will form the dog’s body.
It would help if you held all the segments tightly so they do not get interlocked. You can experiment with the lengths forfeiture needs for the snout and ear segments.
Step 3
Twist the segments to form the ears. Once the snout of the dog is formed, the next two twists will be for the dog’s ears. You must twist the second and third segments together three times with your free hand to form the ears. This lock twist will keep them intact from coming untwisted. Now, you will see the dog’s head.
Step 4
There are three basic twists. Once you form the head, twist a few inches below to create a neck segment. Later, two equal-length twists about 8 inches long below the neck are formed to make two front legs.
It would help if you held all the twists in the same hand to prevent them from coming untwisted. You can make the neck long or short to meet your requirements. In the same way, adjust the leg segments to form the same length.
Step 5
Combine the leg segments. The balloon should be folded at the twist between the already-formed two-leg segments. Later, gather all the leg segments and twist them three times at the base of the neck so that the legs and neck are locked in place.
Step 6
Make three basic twists. Divide the rest of the length of the balloon into four equal twists. The first represents the dog’s body, the second and third are the dog’s back legs, and the last is its tail.
You will need to hold it together to prevent it from getting untwisted. It will now take the shape of the front of the dog with its head and front legs.
Step 7
Back legs and body. Make three basic twists below the front legs about 3 inches long. The first twist will form your dog’s body, and the second and third will be the dog’s back legs.
Collect the segments and twist them thrice at the base of the body segment. Your dog balloon sculpture is now ready with a knotted nose, short ears, front and back legs, and a tail.
Once you have learned to make the basic dog balloon animal sculpture, with some variations in the shape, you can create balloons for several breeds of dogs.
To create a dachshund, you must make the body segment extra-long with short leg segments.
Tips for How to Make Balloon Animals for Beginners
A soft balloon is easier to practice shapes, so do not inflate your balloons fully. To keep your hands dry while blowing the balloons, use talcum powder. Try to use high-quality balloons, even if they are expensive, as they will not burst quickly.
- Buy a good hand pump to blow air into the balloons without hassle.
- While making twists for the various shapes, you have to leave space at the end for the air to be pushed to the tip, and a 3-inch tail will stop the balloon from popping while you work.
- There is a chance of balloon popping often when you practice initially.
- You will have to adjust the size of the parts accordingly if using different-sized balloons; however, the basic instructions for creating a balloon dog remain the same. You will have to practice many times till you get the right twists for the balloon.
Balloon Dogs – Symbols of Art
Jeff Koons, an American contemporary artist, created a unique concept of Balloon dogs in five colors: blue, magenta, orange, red, and yellow. It is one of his most recognized artworks. It is rendered in mirror-finished stainless steel in any of the mentioned colors.
He states that these dog models or sculptures help us connect emotionally with our childhood play and memories. This dog collection is a part of his series called Celebration.